
Double Cross (without a horizontal support section)
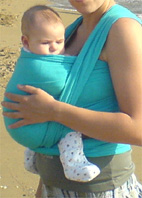


This position is suitable for newborn babies. It uses less fabric than the double cross with a horizontal support section and is just as stable and comfortable.
The wrap I’m using in these photos is a woven (non-stretchy) fabric, 4.5 metres long and about 70 centimetres wide.
1. Hold the centre of the fabric horizontally behind your back, with the top edge under your armpits.
2. Gather (bunch) the fabric slightly so that its full width doesn’t hang down behind you but reaches your waist.
3. Bring one end forward, around your body, and throw it back over the opposite shoulder.
4. Do the same with the other end. The two sides will cross in front of your chest, forming an X.
5. For now the two ends will be hanging down your back from your shoulders.
6. Take the ends behind your back and cross them, forming an X there too. Be careful not to twist them anywhere.
7. Bring these ends around to the front.
8. Tie an adjustable knot in front of your belly, following the instructions you’ll find here.
9. Your wrap can be fairly loose at this stage; you’ll tighten it once you’ve put your baby in. If, however, you’re using a stretchy fabric, you should already have it tied tightly enough against you so that it rests snugly all around.
10. In front of you, you now have an X into which you’ll place your baby.
11. Hold your baby against your shoulder.
12. Supporting your baby on your shoulder, pass one of their legs under one side of the X and into the corner that’s formed.
13. Without lowering the baby, switch shoulders, supporting your baby on the other side.
14. Pass the other leg through the other side of the X.
15. The two sides will cross right under your baby’s bottom and their legs will come out through the openings. As you lower your baby down, the knees will be bent, at least at the same height as the bottom.
16. Take one side of the X (the inner one) and spread the fabric well around your baby.
17. Do this under your baby’s bottom as well, so that the fabric reaches from one knee to the other, opening the child’s legs out well.
18. Do the same with the other side (the outer one).
19. Now it’s time to tighten/stretch your wrap well. Guide all the slack towards the knot. For example, by stretching the fabric well over one of the child’s shoulders and towards your back, you’ll be able to pull it from the outer end on the opposite side of your waist.
20. Using your knot, you’ll bring this excess fabric through the knot towards the end. This way you’ll achieve a good tension.
21. Do the same with all the ends, both inner and outer.
22. It’s very important to make sure that no part of your wrap is loose. This will play a key role in your comfort and in your baby’s correct position.
23. Of course the fabric, besides being well stretched, must also be well spread out, both in front of your baby and behind on your back.
24. You’re ready to go out and about and your baby is safe! Make sure the child’s legs are open and that their knees are higher than their bottom.
back: Instructions with a wrap