
Double Cross with a horizontal support section (with a wrap made of stretchy fabric)
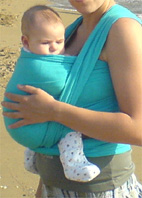


This position is suitable for newborn babies. It’s a very stable and comfortable position, ideal for newborns.
The wrap I’m using in these photos is a stretchy fabric, 4.5 metres long and about 50 centimetres wide. Stretchy wraps are ideal for newborn babies, as you can keep the wrap tied on you permanently and put the baby in / take the baby out. However, once your baby starts to get heavier, it may be better to switch to a woven wrap (e.g. handwoven) for greater comfort and better support.
1. Hold the centre of the fabric in front of you and spread your arms, letting the fabric fall in front of you. Then wrap it around your chest towards your back.
2. With one hand keep the front part taut, and with the other wrap the fabric around your back and bring it to the opposite side over your shoulder and arm. Make sure the fabric isn’t twisted (folded) anywhere but is well spread out across your back.
3. Do the same on the other side, wrapping it too behind your back and towards your shoulder. The two sides will “cross” on your back, forming an X.
4. Now you’ll have the two ends hanging vertically in front of you from your shoulders, and a horizontal section in front of your chest, which you’ll open from the top.
5. Pass both ends through the horizontal section and let them fall back down again.
6. Cross them in front of you, forming an X there (through the horizontal section). Be careful not to twist them anywhere.
7. Guide these ends towards your back.
8. You can tie a knot there.
9. In front of you, you’ll have only the horizontal section and the crossed sides underneath it.
10. Another alternative is to cross the ends behind your back…
11. … and bring them to the front again to tie the knot in front of your belly. (This will suit you better if your wrap is long and if you want to sit comfortably without the knot on your back bothering you.)
12. Now in front of you you’ll have the horizontal section over the crossed ends of the wrap.
13. Your baby will sit in the X they form in front of you.
14. Hold your baby high on your shoulder.
15. Ignoring the horizontal section for now, pass one of the baby’s legs under one side of the X and into the corner that’s formed.
16. Switch shoulders, supporting your baby on the other side.
17. Pass the other leg through the other side of the X. The two sides will cross right under your baby’s bottom and their legs will come out through the openings.
18. Take one side of the X (the inner one) and spread the fabric well around your baby, both across the back and under the bottom, so that the fabric reaches from one knee to the other, opening the child’s legs out well.
19. Do the same with the other side (the outer one). The baby’s knees will be bent, at least at the same height as the bottom.
20. If you like, you can use one side to support the baby’s head. Now take the horizontal section and pass it over the child’s legs.
21. Spread it out well so that it reaches under their bottom and up to their shoulders.
22. You’re ready to go out and about and your baby is safe!
Make sure the child’s legs are open and that their knees are bent and higher than their bottom.
back: Instructions with a wrap