
Simple cross (for short wraps)
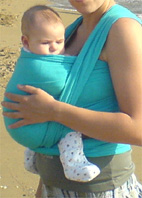


This position is suitable for babies who can comfortably support their own head (around 3 months old). You can wear your baby this way even if the wrap you are using is quite short (e.g. 3 meters long).
Note: In the photos below I am already 6.5 months pregnant and my Vasilis weighs 15 kilos!
The wrap I am using in these photos is a firm fabric, 4.5 meters long and about 70 centimeters wide. A much shorter fabric could be used, however (2.5 or 3 m is enough for this position).
1. Hold the center of the fabric between your hands…
2. … and drop it loosely behind your head, onto your back.
3. This leaves a “loop” on your back.
4. Cross the two ends that hang in front of you.
5. Pass your hand through the “loop” you made in step 3 and grab one end of your wrap (the one that is “crossed” in front of your chest).
6. Guide it to the other side…
7. … and there, at the side, above your hip, tie an “adjustable knot” according to the instructions you will find here.
8. Now you have an X in front of you, inside which your baby will sit.
9. Hold your baby against your shoulder (as if you wanted to burp it) and pass one of its legs through the top of the X so it comes out on one side.
10. Do the same with your baby’s other leg. (If your baby is big, you will need to switch the shoulder you are supporting it on.) Essentially, your baby’s bottom will be sitting on the X you have in front of you.
11. Spread the fabric under its legs, first the inner side of the X and then the outer, so that it reaches from one of the child’s knees to the other. Now tighten the knot as much as needed.
12. You are ready to go out! Make sure the baby’s legs are open and that its bottom is lower than its knees. As you tighten the knot, also make sure the baby is at the right height (you should be able to comfortably kiss its head).
13. The fabric on your back will look something like this. This way you use the minimum length of fabric required for a front cross position.
Note: If your fabric is long enough, you could change steps 5, 6 and 7 by passing both ends of your wrap through the “loop” on your back and tying them in front of you. This way your tie is a little more symmetrical.
back: Instructions with a wrap